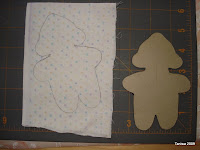
Timi and Janet asked if I could give them the pattern for the little bear mascots my kids made on Tuesday. I really don't know how to do much but blog on this computer so I don't know how to get a pattern anywhere... How about trying to eye-ball it? Here is the pattern next to the cutting mat so that you can see the inches. (Try clicking on the picture.)
Sort of an odd shape but it works out. I could see making the ears a little bigger but you get the idea...

When drawing the pattern onto the fabric I just draw on one piece of fabric and then sew on the lines. Less work than trying to sew on matching lines. I also cut out the figure after it has been sewn. I got lazy when making this yesterday and just used the quilting foot to freehand sew on the lines. Usually (and when I was teaching the girls) I do this all by hand. Don't forget to reinforce the deep turns!
After sewing and cutting out and clipping the corners, draw a line down the middle of the figure from bellybutton to jawline. Cut only ONE of the sides. Don't cut through all the layers!

Turn figure inside out and stuff.

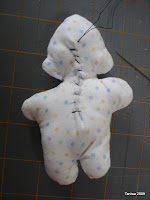
Sew up the "incision" from bellybutton up. The stitches can be rough and it doesn't matter if they can be seen. Probably better to use a double length of thread here.

Pull threads tight to close "wound" and secure but do not clip thread ends.

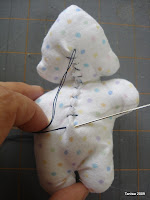
Go back down to the bellybutton and make a stitch and then go back to the jaw area and make another stitch.

When pulled tightly the bear's head will be pulled down and makes the figure three dimensional.

Secure the head threads also but without clipping place the needle at the eye position and thread on bead. Go directly to the other eye position and thread on another bead and then go back to under the head pulling the threads tightly to give the bear a little face dimension too.

With my students I just had them glue on felt triangles for the noses. Yesterday I just used the black thread I had on my needle and went ahead and embroidered a nose of sorts... Finally I cut the thread under the bear chin. A bit of ribbon at the neck will hide any puckers from not enough clipping and any stray incisions peeking out.
He's a cutie. Sometimes I add more ribbon to make a bag accessory or sometimes I will hot bond a broach clasp so that he can be pinned to a bag or blouse.
Hope you got all that!


No comments:
Post a Comment